When a bundle of free software boasts features beyond what the Windows 7 System Image tool can do, I’m typically doubtful. However, in the case of the free product Comodo Time Machine, they deliver. While not exactly allowing you to traverse the space-time continuum, it can create system snapshots efficiently and protect you from unwanted system changes. Comodo Time Machine is available on nearly every modern version of Windows, and it runs amazingly light using both low memory and disk space* and, it’s free as mentioned earlier. *This is referring to the program itself and not the system snapshots it takes, which can be quite large and take a decent amount of CPU priority to create.
Time Machine setup is rather simple, just Click Next a few times. When you get to the Protected partition selection, this is where you Select which partitions on your computer where you want to create snapshots. It was a little confusing to me at first as I wrongfully referenced it to protection meaning un-writable such as you see with protected operating system files.
Once the installation is complete, you’ll have to restart your computer.
When your system comes back from the restart, Comodo Time Machine will be running in the background, and you can access it from the system tray or the start menu.
The launch Quick Operation window offers some simple tasks (restore or create a snapshot) that are pretty much all you’ll use the program for, but these are also available in the Advanced menu.
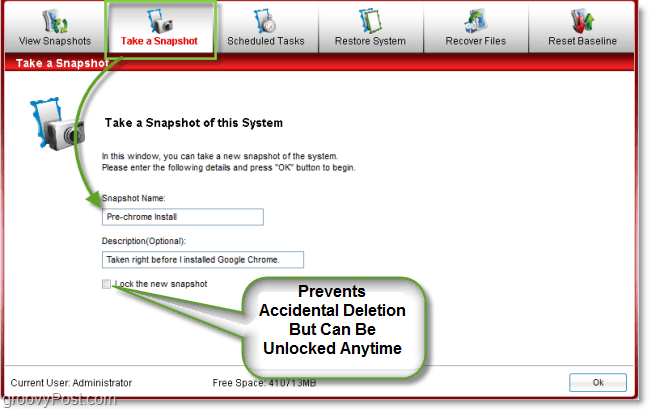
What I like about Time Machine is that it keeps it simple and clean. When you Take a snapshot, there are only three boxes, and two of them are entirely optional. If you’re wondering what the Lock button is for you’ll see why it comes in handy later, but for now it is just to help prevent yourself from accidentally deleting a snapshot.
The View Snapshots tab reminds me a lot of the Hyper-V Manager in Windows Server 2008. Except in this case you’re not playing with virtual machines, it’s the real deal. Here you can jump back and forth between snapshots and Time Machine will reboot your computer right back to the exact way it was when you took the particular snapshot in question. Another interesting note is that snapshots are incremental on the timeline, meaning Time Machine looks at previous snapshots and will only backup files changed since the previous snapshot. This method of creating snapshots is very efficient and keeps the space used for snapshots on your HDD to a minimum. When you restore a snapshot, by default it is set to automatically create a system restore point so that you can undo rollbacks and come back to the present without any data loss. Fear not novice time travelers! Deleting a snapshot can cause system defragmentation, so consider this when creating them. Unless of course defragging your computer is a favorite past-time.
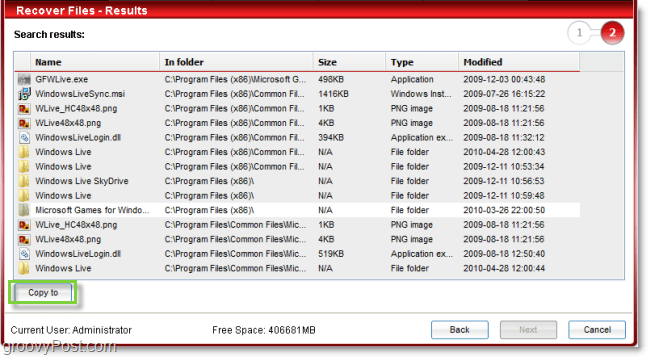
Something the Windows-7 system image tool doesn’t do is let you restore individual files. Say you have one file or folder from a previous snapshot, but you don’t want to have to revert back your entire computer. Time Machine lets you pull just the individual files you want from earlier snapshots and save them to your computer without rebooting or any of that funny business. Even better, it uses a Windows-like search to find the files and folders pertaining to any query you enter. The results from file recovery tab can be copied immediately by just Clicking Copy to and choosing a destination. Again, they keep it simple and that is very groovy.
If you are often doing testing or changes and require frequent regular backups, you can schedule them. You can also schedule system restores which can come in handy, especially if your favorite trial software is about to expire and you want to revert back to when it was first installed.
Another groovy feature unique to Time Machine is the ability to exclude individual files and folders from recovery. Just like how you can recover individual files, if you want to make a current set of files “Time Travel Proof” just add them to the Synchronize list. You will finde this process in Settings > Program Settings > Synchronize these files or folders when restoring system to another snapshots. Overall this is one of the most amazing free programs I’ve reviewed to date. The developer company Comodo is a reputable source of software and is trusted by cnet and other online software review sites. If you want to give it a spin for yourself, just snag a copy from the link below. Download Comodo Time Machine Data Recovery Tool Have you tried Time Machine or another system image product? We’d love to hear your reviews in the comment section below! Anyone else out there play with this and have any problems? Using 64 bit Windows 7. Comment Name * Email *
Δ Save my name and email and send me emails as new comments are made to this post.


![]()
