In a few different tutorials, we’ve talked about changing your Domain Name Service (DNS) server on your router or PC. A DNS server, as you may know, is a server that resolves domain names (like groovypost.com or Facebook.com) into IP addresses (like 67.222.139.238 or 69.63.176.13). Usually, you use your ISP’s DNS server. In many cases, your ISP’s DNS server will be fastest for you, since it’s geographically closest to you. But sometimes, it’s not. You can find out which DNS server is fastest for you by running namebench. Also, many would argue that an alternate DNS—like Google Public DNS or OpenDNS is more secure and more reliable. Whatever your reason for switching your DNS server, the best way to do it is through your router. That makes the change for all devices on your network. But if you don’t have access to your router’s settings, you can change your DNS server directly on your device. For iPhone, iPad and iPod Touch users running iOS 7 (that includes iPhone 5C, iPhone 5S and earlier generation iPhone/iPod users who have upgraded their OS), you can use these instructions. Before we begin, you should choose an alternate DNS server. Here are a few:
OpenDNS – Free, and lets you block websites and filter out known malicious sites.208.67.222.222208.67.220.220Google Public DNS – Free, won’t redirect to ads, faster and more reliable than many ISP DNS servers.8.8.8.88.8.4.4DynDNS – Phishing protection, faster, content filtering.216.146.35.35216.146.36.36
Pick one or two that you like. You can set up a primary and secondary DNS for your iPhone or iPad.
Changing DNS Settings on the iPhone
Pop open your iOS device and tap Settings.
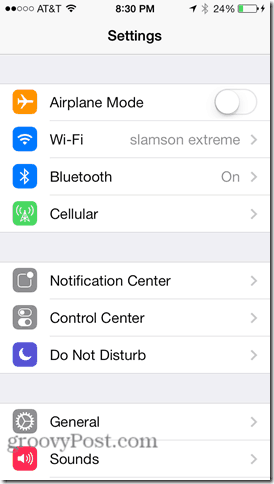
From settings, choose WiFi.
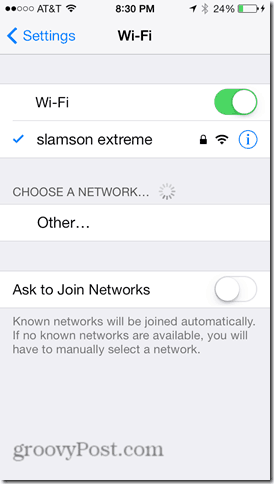
Look for the WiFi network that you use to connect your iOS device. In my iPhone screenshot, it’s slamson extreme. Tap the info icon to the right of it. It looks like a blue “i” with a circle around it.
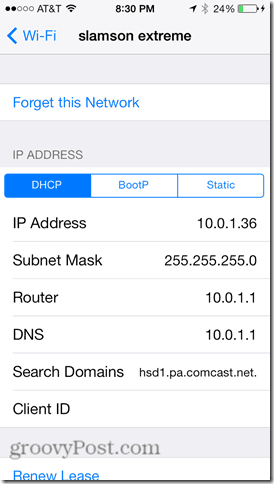
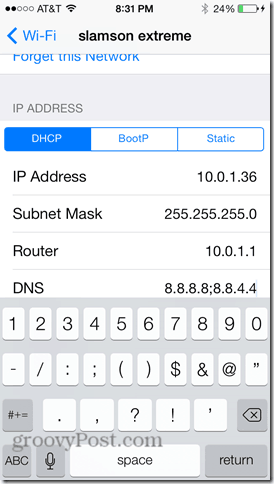
In your WiFi network settings, look for the field for DNS. Tap it.
Type in your preferred alternate DNS server. You can use a semicolon for multiple DNS addresses. For example, Google Public DNS has two servers: 8.8.8.8 and 8.8.4.4. If you enter them both (8.8.8.8;8.8.4.4), then your phone will fall back on the second one if the first one is down.
When you are done, tap WiFi in the top-left to return to the WiFi menu. Test out your new DNS server by trying to visit a website. Preferably, try one that you haven’t visited recently. If the domain name resolves (i.e. the website loads), try bookmarking it and then loading the bookmark. If that works, you’re all set. If the domain doesn’t resolve, try typing in an IP address directly. For example, instead of typing in Google.com, type in: http://74.125.224.72/ and see what happens. If that loads Google, then your DNS servers may be misconfigured. Go back and check for typos. If nothing loads, then you may be having some other network connectivity problem.
What About Changing DNS Servers on 4G?
There is no quick and easy way to change the DNS servers (or practically any other settings) for your cellular data connection. You can jailbreak or use the iPhone Configuration Utility. But I’ll cover that in another post.
Conclusion
Depending on how fast and reliable your default DNS server is, you may see significant improvement by switching to a public DNS. Or, you can enjoy the web content filtering and monitoring benefits of OpenDNS on your iPhone. No matter what, now that you’ve read this tutorial, you have the option to choose who resolves your domain name requests. There is also an easy way to change DNS on iPhone and iPad. Please check DNS Override app made by QRMedia (https://itunes.apple.com/us/app/dns-override/id1060830093?mt=8). You can either change DNS manually using included instruction or use great DNS Override feature to set selected DNS for all cellular and Wi-Fi networks. App also includes list of recommended DNS providers with easy to understand list of features. Comment Name * Email *
Δ Save my name and email and send me emails as new comments are made to this post.


![]()
