Are you ready to say goodbye to 3rd party back-up applications? Windows 7 makes this possible with its excellent back-up and System Image features built into all versions of Windows 7. For me, I love a clean install of Windows. Not coincidentally, right after a fresh install is the best time to make a system image – because creating a system image is just like taking a snapshot of the entire drive. Creating a System Image will save everything on the drives you select, and then compress them into an image file which is good news since this means less space for backups! At a later time, if you want to return the computer to its original condition (when you bought or built it,) you can just load up the image and presto! No more “reformat the computer” ritual and no more worry about losing your entire system to a computer crash. Sounds great right? How do you do it?
Important
Before starting this How-To Tutorial, please confirm the backup drive where you will save the image is formatted using NTFS. For more information on this reminder, please see the bottom of this how-to tutorial where I review How To format your backup drive and configure it with the NTFS file system.
How To Create A System Image In Windows 7
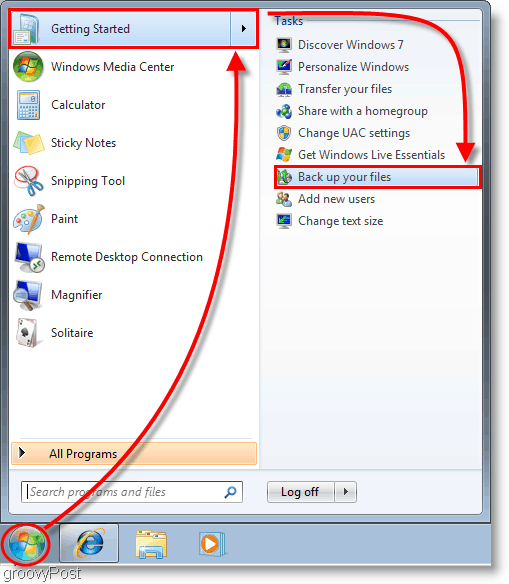
- Click the Start Menu, then at the top of the menu Click Getting Started, then on the side Click Backup your Files. Note: You can also just type BackUp, and Windows 7 Search should find the application
2. In the Control Panel window that appears, Click the blue Create a system image link.
3. The Create a system image window should pop-up. Select which hard disk, DVD, or network location where you are going to save your system image. Click Next to continue.
4. On the next page, we’ll keep with the basics; but for now, Check both your System and System Reserved drives. Once you have selected the drives Click Next to continue. Note: You can select as many drives as you want, but the more you choose to include means the larger the image size will be.
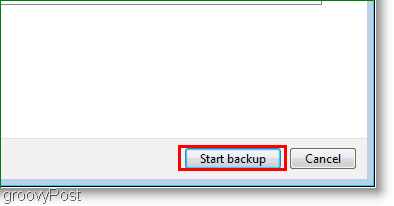
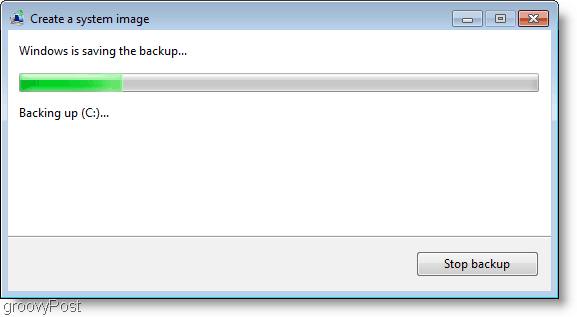
5. The next window is just a review, so make sure everything is correct then Click Start backup to start the process. This process can take several minutes, so patience is required.
6. After the backup completes, you are presented with the option to create a system repair disc. This option is a good idea just in case your system has any problems in the future. Click Yes.
7. Choose which Disc Recording drive you’ll be using to burn the disc. Insert a blank CD or DVD to the physical drive and then Click Create disc.
Conclusion
Now you’re covered if your computer crashes, or if you want a clean slate and the option to be able to return to the way your computer currently is. When that time comes, be sure to read this Tutorial – How-To Restore from a Windows 7 System Image backup.
Important Update – 1/24/2011
Looking through the comments, some readers have been running into issues during the backup/image process. While creating the system image and saving the data to the backup drive/external hard drive, the process aborts and Windows reports the backup drive has run out of disk space even though the drive appears to be almost empty.
One of our readers pointed out the common reason for this failure is probably because the drive was formatted using a FAT or FAT-32 file system. A FAT-32 file system is limited in that it will not support files larger than 4 Gigabytes. So, even if the drive is 500 Gigs with several hundred gigs of free space available, you likely will not be able to save a system image to it since your system image file will probably be larger than 4 Gigs. The NTFS file system does not have this limitation, so my recommendation is to format the backup drive before hand and use the NTFS file system before storing any data on the drive or completing the How-To Tutorial above. How to Format a backup drive using the NTFS File System Note: Formatting your backup drive will remove all data from it. If the drive has any data you need, save it somewhere else before you format it. Open Windows Explorer and Right-Click the External/Backup hard drive where you will store the Windows 7 System Image. From the context menu, Click Format.
Click the File System Down Arrow and Select NTFS then Click Start.
The drive should now be formatted, and you should be good-to-go. Now granted, it is also possible to convert a FAT-32 drive to NTFS. However, it’s possible you could have a bit of data corruption, so my recommendation is just to keep things clean, and reformat the backup drive as NTFS. I’ve not used the Acronis product but I’ve been using GHOST for 10 years now. Ghost is great and I actually still use it for imaging systems over the network etc.. but for home users I don’t think you can beat the simplicity of the new Windows 7 backup tools. A few nice things is yes, you can restore bare metal systems (article almost done) but you can also image live systems since they are using shadow copy to copy the files into the image. Pretty slick stuff and once I get time over the next few days I’ll be posting a few more articles on the subject. BTW – Welcome to the site! The “image” size was 44gigs however my drive is only 50gigs so the compression they use (if any) is not very good. I’m going to guess they don’t use compression because the ending file is a .vhd file. This is good and bad. Good because I can probably mount it and pull what I want at a later time. Bad bacause the compression is probably lame. For now, I’m going to keep my good ole GHOST handy for my monthly images. :) With “when” to createa system image, it comes down to personal preference. If there are certain programs on your computer that you know you will ALWAYS use, then it can be handy to not worry about reinstalling them if you ever want to revert back to a clean slate. You’ll have to consider how often you’ll want to restore the image. You can also create multiple images, but this can quickly take up a lot of space. For me, the first thing I do after installing Windows 7 is Windows Update, followed by installing Microsoft Security Essentials. Then immediately after those two I create the system image. Why? I would opt to install Office and other programs, except that newer versions of those software are about to be released (Office 2010). I like to start with a clean slate everytime I revert back to the image without worrying about uninstalling the old software (which could possibly leave stray files and registry keys floating around). Some people aren’t bothered by this but if I’m running an EXPENSIVE PC then it’s a comfort to know it’s clean and running at 100% efficiency. I’ll usually only restore system images about 3 times a year as a sort of “housekeeping” procedure. You’ll also need to take into consideration that if you purchased a Dell, HP.. etc. The PC is going to come packaged with a ton of software that you most likely won’t want. Many of the software suites will be trial too, which can be frustrating however creating a system image and reverting back can be a way to extend some trial programs. such as ones that don’t rely on date expiration. I would recommend uninstalling all unwanted software then creating the system image before installing any new software. There are other times to create a 2nd system image, such as: -Right before installing a new unfamiliar software application -If you have some good software installed but lost the CD or Product Key -On a regular basis incase your system crashes Hope this helps! Just confirming – seperate HDD or NAS for the target of the backup do you think? The HDD connects via a USB, NAS is on our home network. Thanks awfully for your suggestions! Cin That being said, the drawback is NAS is probably more expensive than you simple USB external drive and might be better used storing your images, files etc… rather than storing your PC image and regular Windows backups etc.. so that’s +1 for the External Drive on USB. Another Plus for the external drive is you can keep your System Image and Backup’s on it and keep it locked in a Fire safe ($200.00 from Costco etc..) or take it to work and lock it in your desk in case your house burns down. Either way, might be worth cutting an image and storing it in both place :) This additional extra I have on my laptop is agod send, it seems silly to me that it cannot be added to all forms of the OS. I am assuming that the boot DVD (“restore boot DVD” I guess as a description) can only be made once? Seems to be both an HP and a Compaq “issue”. Following on, have you ever tried using a standard DVD copy of a restore DVD and made it work? I am wondering if I should go to the effort? As a supplemental question – on the Compaq, should I go for an Upgrade to Win 7 Home premium (no need for domains etc.) and install “over the top” or do a re-install from the Vista recovery partition, then upgrade? Thanks heaps for your help – it’s really appreciated!!! Here’s three virtual beers for you!!! Cindy. Cin. http://www.sevenforums.com/tutorials/2083-system-repair-disc-create.html Well first let’s go down the bunny trail of drive space. How much do you have now on your C drive (Click Start button, Click Computer). C Drive should show GB FREE and GB Used. In that same Computer view it should also tell you how much space is left on your External 1TB drive. Do you have enough space? I post this for future reference for new people arriving here. Thnx again If you restore your Hard drive using the Windows 7 System Image, it will wipe your HD then bring back your Hard Drive EXACTLY the way it was when you made the image. Your new install will be GONE and all the Apps you might have installed with that new image. You will however have all the apps installed that was on your system when you took the original image. If you nuked it when you installed Ultimate, it’s probably gone. I am getting the same thing but with a 32Gb USB thumb drive. Although mine manages to get to about 75% before asking me to insert the new ‘blank media’. I check the thumb drive at this point and there is 3.99Gb backed up with reams of room to spare on the drive. Once I hit OK it just overwrites the existing backup and starts again. Thanks, -MrGroove Yeah your fine. Nothing to worry about. The system image process uses Volume Shadow Copy so files that are open can still be backed up etc… Nothing to worry about as long as you don’t start blowing away a lot of data or try to install/uninstall something. At that point, your mileage may vary if it even lets you. I’ve never actually tried that :) Thnaks, Daf Microsoft TechDoc http://technet.microsoft.com/en-us/library/dd744512(WS.10).aspx?ppud=4 Good user tutorial http://www.youtube.com/watch?v=V2BQmZx-H8M ~Andy Now what about the case in which some of the program files are on the main C: drive (which is a small SSD) and in addition (all of the installation-configurable) program files are on another (D: drive). D: is also my storage drive — it holds all my user data 2 TB) When I initiated image creation, it was smart enough to realize that it needed to grab files from my D: drive as well. However, when (if) I ever need to restore, will it wipe my entire D drive? (which means I lose all my user data unless I have it backed up elsewhere)? Just trying to be sure I understand ramifications… Be sure to format the external drive using the NTFS file system. FAT-32 Is limited to 4 Gigs. When i try to take a system image of windows ( 64 Bit ). to the HDD, it is saying, volume ” windows 7 system image error 0x8078006B “ I do however have a question. I just bought 6 identical pc’s Acer Iconia Tab 501W with Windows 7 home premium Is it possible to re-establish all of these using the same image and System recovery disc for all of them, or do I need to make 6 different sets (one set for each pc ?) Im asking also in order to avoid going through the upstart with each of them, removing the amazing amount of crapware is very time-consuming. So if I only need to make one pc perfect and then reuse that image on the rest, it would save my day. Best regards, Birger, Copenhagen Denmark And thanks for the comment on the post. I’m glad it helped you out! Welcome to groovyPost! means i am creating an image in 0830 (Lenovo machine) model and try to deployed the image in 7507(Lenovo machine) model.. Plz help me the image backup function – and on the ability to use Windows Home Server to back up, as well. Three out of four new Windows 7 computers at a local center where I volunteer were hooked into Windows Home Server. They were also all upgraded with SSDs (Samsung 840s) to improve productivity. Windows Home Server wouldn’t back up three of them, and failed with an “insufficient space to create a volume shadow copy” error. At first I thought it was the SSDs, but why 3 of 4? Much searching led to a thread that said that when Windows System Restore packs too much information in the 100 MB system partition that Windows creates during installation – such that free space on the partition drops below 50 MB – the backup will fail. So, too, will Windows Image backup fail. The failure doesn’t occur when you only back up user files. I checked, and the three that wouldn’t back up to WHS sure enough only had about 5-10 MB free space left in the 100 MB partition; the fourth machine, however, didn’t have the 100 MB partition at all – so there was plenty of space to create the volume shadow copy. Why 4 seemingly identical Gateway DX4870s would differ in this way is odd – but I think image backup, which gives you a rapid return-to-yesterday capability in the event of catastrophic disk failure (we keep a whole spare computer ready to be put in service if one of the critical staff’s machines dies) is a very valuable tool. Why Microsoft would put ever-increasing restore point data in a tiny partition, which needs space to create the volume shadow copy required by that valuable tool – such that the tool is eventually rendered useless – is a mystery to me. Deleting restore points hasn’t worked, and suggestions on the web of how to fix this present the risk rendering the machine unable to reboot. Poor design in my opinion, and it continues on Windows 8. To delete all but the most recent restore point Open Disk Cleanup by clicking the Start button Picture of the Start button. In the search box, type Disk Cleanup, and then, in the list of results, click Disk Cleanup. If prompted, select the drive that you want to clean up, and then click OK. In the Disk Cleanup for (drive letter) dialog box, click Clean up system files. If you’re prompted for an administrator password or confirmation, type the password or provide confirmation. If prompted, select the drive that you want to clean up, and then click OK. Click the More Options tab, under System Restore and Shadow Copies, click Clean up. In the Disk Cleanup dialog box, click Delete. Click Delete Files, and then click OK. The other possible solution is to boot the computer from a recent version of Linux (CD, DVD, or USB drive – I like Ubuntu or Mint) and use Gparted to resize the 100 MB system partition and move the C: partition to the right on the disk. I haven’t tried either of these solutions, and using third party disk editors on Microsoft OSes is sometimes a problem. (I remember trying to use the DOS editor Gdisk/a> to partition a disk one time and subsequently Windows either wouldn’t install or wouldn’t boot after installation. So do test this and make a backup of important data from the computer you are trying it on. Comment Name * Email *
Δ Save my name and email and send me emails as new comments are made to this post.


![]()
