Snagit makes it easy to take screenshots of windows, regions, your entire screen, or even content that extends beyond a single screen (scrolling web pages, for example). It’s also got one of the slickest and most intuitive image editing suites built-in with a handy organizer for all your screenshots. As someone who takes hundreds of screenshots for dozens of articles, Snagit most definitely pays for itself in ease and productivity. So, that’s the overall rave. Let me show you some of the main features of Snagit, how they work, and how they stack up to free screenshot apps. Pro Tip: Grab the free trial of Snagit and follow along as you read through my review.
Snagit Capture
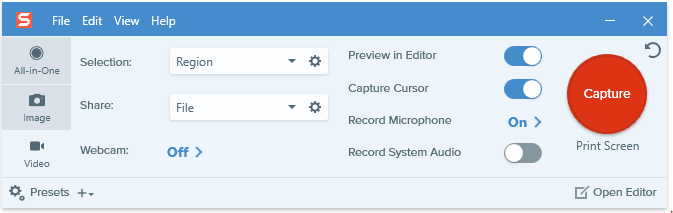
Snagit captures both images and videos from your screen. By default, Snagit uses the all-in-one capture tool that lets you do one or the other.
If you want a bit more control, you can choose to capture an Image or a Video on the left.
Each one has its own set of presets:
The hotkey is Print Screen by default. You can change it by clicking the hotkey beneath the Capture button. This is useful if you are using more than one screenshot tool.
The Capture interface is busy but intuitive once you get your bearings. When you hit your screen capture hotkey, you get a pair of orange crosshairs. Snagit will automatically select regions inside a window, the entire window, or the entire screen depending on where you position your cursor. You can click once to grab that region or window, or click and drag to get the custom selection.
The arrows let you capture a scrolling window.
Also notice the magnifier, which lets you choose a custom region down to the pixel. Extremely handy for cropping out that pesky whitespace. This will save you hours of editing in the long run.
When you click, you get the option to capture an image or a video, if you haven’t already predetermined this. Once you choose, the screenshot gets sent to the editor by default. You can either continue snapping screenshots or edit right away.
If you choose to capture a video, the screen capture will begin with audio and webcam enabled, too. I’ll show you more on that later.
Snagit Editor
The Snagit Editor has gotten a major makeover since I first started using the application. The overhauls began in Snagit 12 and had continued in Snagit 13. At first, it looks a lot simpler, dumbed down even. But all the features are there, you just have to add them back to the toolbar. Click More to see what’s hiding from you.
Snagit Editor is quite a powerhouse. I use it for editing images I didn’t even take with Snagit. (For example, for this tutorial, I had to use Snipping Tool to take screenshots of Snagit itself, but I still edited them in Snagit.)
Snagit Drawing Tools: The Basics
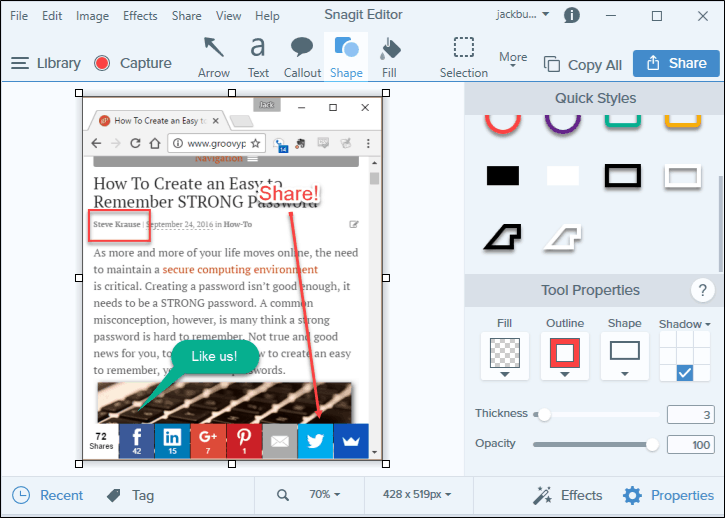
First, let me show you the basics. Here you’ve got the main editing window in the middle, your toolbar on the top, your toolbar settings on the right, and the Almighty thumbnail browser on the bottom.
This should be a familiar setup for anyone who’s used another image editing application. But it really works for Snagit. I love that you can zip between screenshots with ease from the thumbnail browser or X out the ones you don’t want.
Each editing tool in Snagit has a Quick Styles menu. You can customize your properties and save it to Quick Styles. This goes a long way in quickly creating consistency in your screenshots.
The Tool Properties section shares real estate with the Effects tab. The Effects tab lets you quickly apply frequently used effects and edits from Snagit’s defaults or your custom presets. It takes only a few minutes to master these few tools. After that, you can whip through screenshot edits, adding callouts, etc. at lightning speed. The basic tools that you’ll use in most screenshots are Arrow, Text, Callout, and Shape. The arrow tool includes solid and dotted lines and customizable ends (arrows or dots).
The Text tool lets you choose colors and outlines to help text stand out on the screen. You can use any font you have installed on your system.
Callouts are faster and more stylized than an arrow and text combo.
Shapes are a clean way to highlight a section of your screenshot.
Those are just a few of the editing tools Snagit offers. There is much, much more. The full set of drawing tools includes Move, Crop, Callout, Text, Arrow, Shape, Step, Blur, Stamp, Line, Cut Out, Fill, Eraser, Selection, Pen, Highlighter, and Magnify.
Under Effects, choose from Border, Edges, Perspective, Page Curl, Shadow, Filters, Color Adjustment, Color Replacement, Spotlight & Magnify, and Watermark.
Snagit 13: What’s New?
The new Snagit 13 features include a customizable toolbar, panoramic capture, animated gif creation, and webcam support for screen capture videos. Panoramic capture is much like the panorama feature on your phone’s camera, except for screenshots. It can be useful when trying to take screenshots of objects that are too large and sprawling to capture their full majesties, like a double rainbow or a Google map route.
For videos, you can switch between your screen and your webcam in the middle of a recording. With Snagit’s limited editing features, this is the best way to splice together intros and conclusions with your screencast.
Once you capture your video, you can save it as an animated GIF or upload it to a video sharing site.
Snagit Editor: Other Cool Features
Beyond the tools and effects you get, the interface and details of Snagit Editor are excellent. Here are a few things that I noticed when editing images recently. Snagit supports layers and objects. When you create objects with the drawing tools or paste images into Snagit, you can continue to drag and drop them, resize them, group them, or delete them. When you’re done, you can re-order them and then flatten them. All of this is done from the right-click contextual menu.
If you choose to capture the mouse cursor, it’ll show up as an object, too. You can easily move it out of the way without retaking the screenshot. Nice!
When you take a screenshot, you have an opportunity to fine-tune it. You can drag the edges or corners of the capture selection to get it just perfect.
The Snagit batch conversion feature can be immensely useful. It lets you batch convert image files or apply filters or effects to multiple files at once. I wrote up this feature in an earlier review. The feature is still there, and it’s still great.
The number of file formats supported is just bananas. If you’ve ever had someone send you 50 images, all the wrong orientation, all in the wrong format, and all needing a watermark, then you need Snagit and its batch conversion feature.
Organize
For me, having the recent screenshots in the thumbnail browser at the bottom is good enough. But Snagit has a pretty robust screenshot library feature that lets you tag and organizes your screenshots as you see fit. It automatically creates categories for a date, application, website, and type of screen capture.
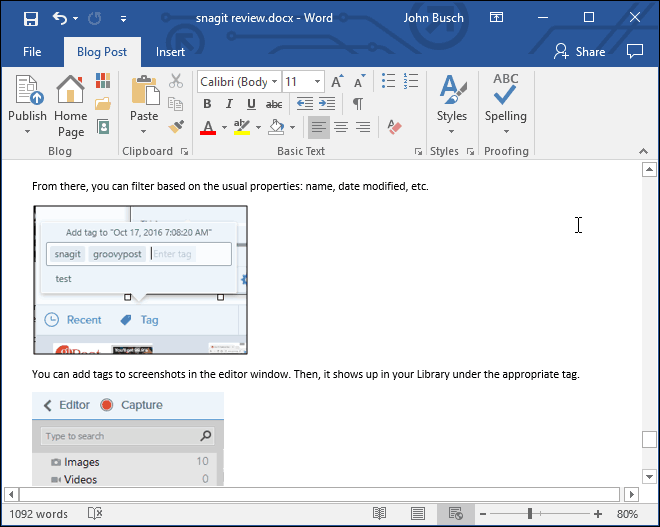
From there, you can filter based on the usual properties: name, date modified, etc.
You can add tags to screenshots in the editor window. Then, it shows up in your Library under the appropriate tag.
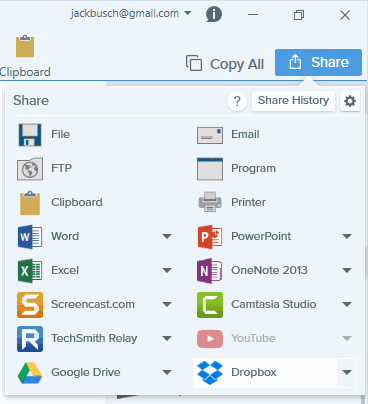
Share
Snagit is flush with options for sharing your screenshots or screen captures. For me, my favorite is still copying it to the clipboard and pasting it into Microsoft Word.
You can also copy and paste into Gmail and Google Docs.
Aside from the simple approach, Snagit also lets you share a wide variety of platforms. I see this being useful for videos, where you might want a hosted platform like YouTube or Screencast.com.
Video and Screencasts
Snagit has the ability to capture your screen and record from your webcam, a microphone, or system audio. For quick tutorials or how-to videos, this is pretty handy.
Admittedly, the reason you buy Snagit won’t be for the video capture. The editing capabilities for the clips you capture are pretty much nonexistent. You do have the option to save it as an animated gif, though. For serious video capture and editing, TechSmith makes another fantastic product: Camtasia. I reviewed Camtasia Studio 7 way, way back. I’ll be reviewing the new version soon. Stay tuned.
Conclusion
TechSmith’s Snagit has definitely gotten a facelift. I’ll admit that I still haven’t gotten used to the new interface. I’m assuming I will, considering how often I use the program. The core features are still there, and they still rock. And as always, TechSmith’s attention to detail and intuitive design make Snagit a must-have for anyone who takes screenshots on a regular basis. All that being said, the free screenshot tools are catching up regarding features. The built-in Windows Snipping Tool still works perfectly fine for the most rudimentary screenshots, like dropping a screenshot into an email or capturing an error message. The new Snip app for Windows 10 is worth a try, too. But honestly, if someone is paying you to take screenshots and create professional documents, then you should invest in Snagit. The time it’ll save you and the consistency and clean callouts it gives you are well worth $49.95. If you have an upcoming project, I recommend giving the 15-day free Snagit trial a whirl. You’ll see how it turns taking screenshots into a pleasure instead of a chore. If you buy Snagit, you can upgrade for $24.95. They release a new version number about every two years. I usually buy the upgrade, but the old versions are far from obsolete—I’d use Snagit 9 over any paid or free product any day. Do you use Snagit? Do you love it? Tell us about it in the comments. Then, when you start the region capture, it still shows the X,Y coordinates but also shows the size of the region capture, at the point of the cursor… really good ! It may sound silly, but I really like this option. I wish there was a way to toggle between showing the X.Y coordinates and showing, as you have said, what you see it in your fifth screen shot C: / Users / <> / Appdata / Local / Techsmith / Snagit / Datastore I have over 6,000 files stored here, ready to be imported back into the SnagIt Editor very easily… This could pose a security risk. Does TechSmith have a method to manage these files. As far as I know, these captured images do not show up in the Library… Can you confirm? C: / Users / “User Name” / Appdata / Local / Techsmith / Snagit / Datastore Even when I save the capture, as a JPG or other, the SNAG file remains in the folder. Is there some option I have not set which will delete these SNAG files when I save the capture??? After testing, again, I can see that you are correct… the SNAG files disappear after I save then capture as a JPG. Just to note, when you alter a capture (I Resize the Canvas to crop captures quite frequently), Snagit saves a copy of the original capture as a SNAGundo file and creates a new SNAG file. If the original capture is required, the user can always rename this SNAGundo file to a new SNAG filename and open it up in Snagit. Not sure if this answers your question or not but, when you SAVE the image you took, you can choose the quality of the .JPG. Just click Save As > .JPG and Click OPTIONS. This is where you can adjust the quality of the saved file. Does that help? Oh – and I agree — AWESOME article Jack. ;) -Steve groovyPost And to answer your question, I do know Snagit and I do love it! Panoramic is usually what I have wanted from a scrolling capture, so that feature has been a big win for me. Another thing I didn’t know for a while is that when you’re looking at the magnifier and trying to get pixel perfect precision to avoid capturing any white space or border, you can use the arrow keys to adjust the capture size one pixel at a time. I can’t take credit for discovering these two tips. I think someone here showed me these tricks. :) Mike Curtis Business Development, TechSmith I found out about using the arrow keys for precision after using Snagit for quite a while. I used to struggle to get the perfect capture ! Thanks for the Tip about capturing Snagit, itself. Very useful ! And thanks to Jack for the great article !!! Comment Name * Email *
Δ Save my name and email and send me emails as new comments are made to this post.


![]()
